
Drywall Repair Is a Home Improvement Project
Drywall Repair Las Vegas is a relatively straightforward home improvement project that most homeowners can do. Before starting, wear a face mask and eye protection when working with drywall compound. It generates a fine dust that will infiltrate surfaces and harm your health.
 For small dents and holes, apply spackle or a lightweight joint compound to fill them, then sand and feather the edges to make the patch look seamless with the wall.
Drywall is a great wall material because it’s easy to coat and paint but can also be quite susceptible to damage. Scratches, marks, dents and holes are all fairly common. Thankfully, most of these problems can be easily repaired with some spackle and a bit of patience. In fact, even if you’re not the most handy homeowner, you should be able to take care of small dents and holes in your own home for less than $100, including materials and labor.
When it comes to repairing drywall, the first thing you’ll want to do is make sure the work area is completely clear. If there’s a chance you could come into contact with an electrical wire or plumbing line, shut off the power to the area before proceeding. Next, use a utility knife to cut around the hole to remove any protruding paper or gypsum. You’ll need to do this to allow the patch you’re going to apply to stick to the wall.
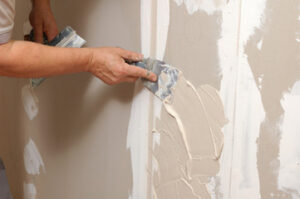
If the drywall is still intact, you can repair your dent by applying a thin layer of joint compound to the damaged area. You can buy a tube of drywall compound for as little as $10 at most hardware stores. Just be sure to choose a compound that is intended for this type of project, as it’s more durable than other types. Then, using a putty knife or a trowel, spread the compound over the damaged area, smoothing it out and filling in the dent. Let it dry, then sand the area down and apply some touch-up paint.
If the drywall is not intact, you’ll need to get a new patch. There are two options for this: either paper joint tape, or self-adhesive mesh tape. The pros tend to prefer the mesh variety, as it makes for a much quicker and easier fix. Once you have your patch, lay it over the hole and apply a generous amount of drywall spackle or joint compound to it. Again, be sure to spread it evenly and smooth it down with your putty knife or a trowel.
Large Holes
Unlike small dents and nail holes, large holes aren’t as easy to conceal with a touch-up of paint. But you can still make a reasonably good repair with enough work and the right materials.
Start by squaring off the hole. Use a utility knife or razor blade to transform the irregular shape into something that’s square, and remove any loose paint or debris from the area. Then, sand the area smooth.
Now that the hole is clean and sanded, it’s time to prepare the patch. If it’s not already installed, place a piece of mesh tape over the edge of the hole and secure it to the wall with drywall screws. This will help strengthen the patch and reduce future cracking.
Then, apply a coat of joint compound. This step will create a nice, even surface for the next steps. The best drywall compound we’ve found is DAP’s Eclipse, which comes in a handy tube and has excellent spreadability. You’ll need to apply several layers to get a nice, smooth finish, and you should let each one dry thoroughly in between. But if speed is more important than quality, you may want to consider 3M’s Erase-A-Hole Kit, which is designed for fast drywall hole repair.
Alternatively, you can try using what’s known as a California patch. This is basically a piece of scrap drywall that’s modified so you can screw it into the hole and mud over it. This method works well, but it’s a bit more labor-intensive than simply using a drywall patch kit.
Another option is to simply re-tape the perimeter of the hole, and then fill and sand the entire area. This will also strengthen the corner and give you a nice, even surface to paint.
Once you’ve finished sanding the patch and applying a final coat of joint compound, it’s ready to be painted. You should prime the area, too, to prevent any stains from showing up after you repaint. Depending on the size of the hole, you may choose to repaint just the area around it or to repaint the entire wall.
Cracks
Drywall Cracks
Small, thin cracks in drywall are often no big deal and are just a normal part of house “settling” that can easily be repaired by re-taping the drywall seams. Occasionally, though, cracks in drywall can be red flags for more serious structural problems, such as foundation settlement or framing deterioration.
Generally, cracks in drywall are the result of some type of movement in the underlying structure, especially at the corners where two pieces of drywall meet. Some of this movement is due to minor changes in temperature and humidity, while other causes may be more serious issues like improperly sized or connected framing, settled foundation walls and slabs, and wood rot caused by water damage.
While some people might choose to simply fill in a crack with spackle or drywall mud, this is usually not the best solution. The problem with this method is that it doesn’t provide the necessary strength and support for a long-lasting repair. Plus, the slightest shift in moisture or settling will cause the crack to show up again. The better option is to re-tape the crack using proper drywall repair methods.
This means scraping away any loose or crumbled drywall tape and sanding the area smooth. Then, apply a light coat of drywall compound or patch compound over the surface of the sanded area. Allow it to dry and then add a second and third coat, sanding each time until the surface is smooth. Then, sand again and repaint the wall.
Whether the crack in your drywall is the result of normal house settling or some other issue, a professional drywall specialist can repair it quickly and effectively. These specialists are experienced in fixing holes, bad drywall seams, nail pops, and other issues resulting from a building’s settling. They can also help with problems caused by water damage and other types of structural issues. They can also restore and repaint the drywall after repairs are complete to ensure a fresh new look. Their services are available for both residential and commercial properties. They can also repair plaster ceilings and popcorn ceilings.
Mold
Mold damage often indicates a larger problem that can spread from the wall to the studs and other parts of your home. A leaking roof, an improperly installed vapor barrier or constant contact with water can all lead to mold damage. Unlike cracks and holes, which can be filled with drywall compound, mold can only be removed by cutting the affected area out of your wall and replacing it. If the mold has spread to wood, you may need to replace other areas of your home as well.
If you notice a musty odor or black splotches on your painted walls, mold is probably the culprit. It can also cause other problems like wallpaper and paint peeling, and deteriorate the underlying framing. If you notice these signs, it is important to remove the moldy drywall and treat the surrounding areas with a mildew and mold primer like Kilz to keep the mold from coming back.
When dealing with a moldy drywall, be sure to wear a mask and gloves. The microscopic mold spores trapped in porous materials like drywall are very difficult, if not impossible, to fully remove, even after scrubbing. This is because the spores remain in the pores of the drywall, much like dirt or oil stays in your skin’s pores.
A stronger chemical solution like bleach or Concrobium Mold Control spray can help, but be sure to properly ventilate the room before applying. Bleach creates toxic fumes, so it is essential to open doors and windows and use a fan to air out the room.
Another option is hydrogen peroxide. This is a non-toxic cleaner that can be used to kill mold, but it is important to scrub the entire area thoroughly and leave the cleaner on for several minutes before wiping it off to achieve best results. If you choose to use this method, always test a small area of your wall with white paint to ensure that it will not be discolored by the peroxide.
Once you have repaired the moldy drywall, apply two or three coats of joint compound to the new surface, using a putty knife. Be sure to sand the corners with a fine-grit sanding sponge to smooth the edges and make them crisp.